Installation
This guide covers downloading, installing, and signing in to the azuma nori desktop app.
1. Download the installer
Download the package for your operating system:
| Platform | Download |
|---|---|
| Windows | azuma-nori-setup-1.25.1.exe |
Linux (Ubuntu 24.04+, .deb) | azuma-nori-setup-1.25.1.deb |
| macOS — Intel | azuma-nori-setup-1.25.1-x64.dmg |
| macOS — Apple Silicon | azuma-nori-setup-1.25.1-arm64.dmg |
By downloading and installing the azuma nori installer, you accept the License & Use Agreement (On-Premise).
The links above point to 1.25.1. After your first install, azuma nori checks for updates automatically and offers a one-click Restart & update, so you stay on the latest version without re-downloading. Upon starting a newly updated version, a What's New window will automatically appear to highlight the latest features and changes.
2. Install
- Windows — run the
.exe. The installer is code-signed by azuma healthtech GmbH, so Windows SmartScreen should not flag it as an unknown publisher. - macOS — open the
.dmgand drag azuma nori into Applications. The build is signed and notarized. - Linux — install the
.deb(e.g.sudo apt install ./azuma-nori-setup-1.25.1.deb). The.debinstalls an AppArmor profile required for the sandbox on Ubuntu 24.04+.
The first time azuma nori analyses a project, macOS may ask "azuma nori wants to access files…" (in German, "möchte auf Daten zugreifen"). This is expected: nori reads your project's source files to run the analysis locally on your machine — nothing is modified or uploaded. Click Allow (Erlauben). macOS remembers the choice, so you're asked once per folder, not on every run. If you clicked Don't Allow (Nicht erlauben) by mistake, you can re-enable access under System Settings → Privacy & Security → Files and Folders.
Tip: macOS treats Downloads, Desktop, and Documents as protected locations, so
projects kept there trigger this prompt. To avoid it entirely, keep your code in a regular
folder such as ~/Developer or ~/Projects.
3. Launch and sign in
- Open azuma nori.
- On the sign-in screen, choose how to continue:
- Have an azuma account? Click Login with azuma doa. The app opens your browser to complete sign-in, then hands control back to the desktop automatically.
- New to azuma? Click Create one and follow Create an account below, then return here to sign in.
- After sign-in, choose your workspace on the Select a Workspace screen — "Choose a licensed nori workspace to continue". Only workspaces with the nori license are listed.
If you see Not Eligible, your account has no workspace with the required nori product license. Use Try again after access is granted, or Sign out and contact your administrator. See Prerequisites.
4. Create an account
New to azuma? You don't need a pre-existing azuma doa login. On the sign-in screen, click Create one to open the registration form.
Self-registration is currently available only in the azuma nori Standalone desktop app (the sign-in screen). There is no separate web sign-up.
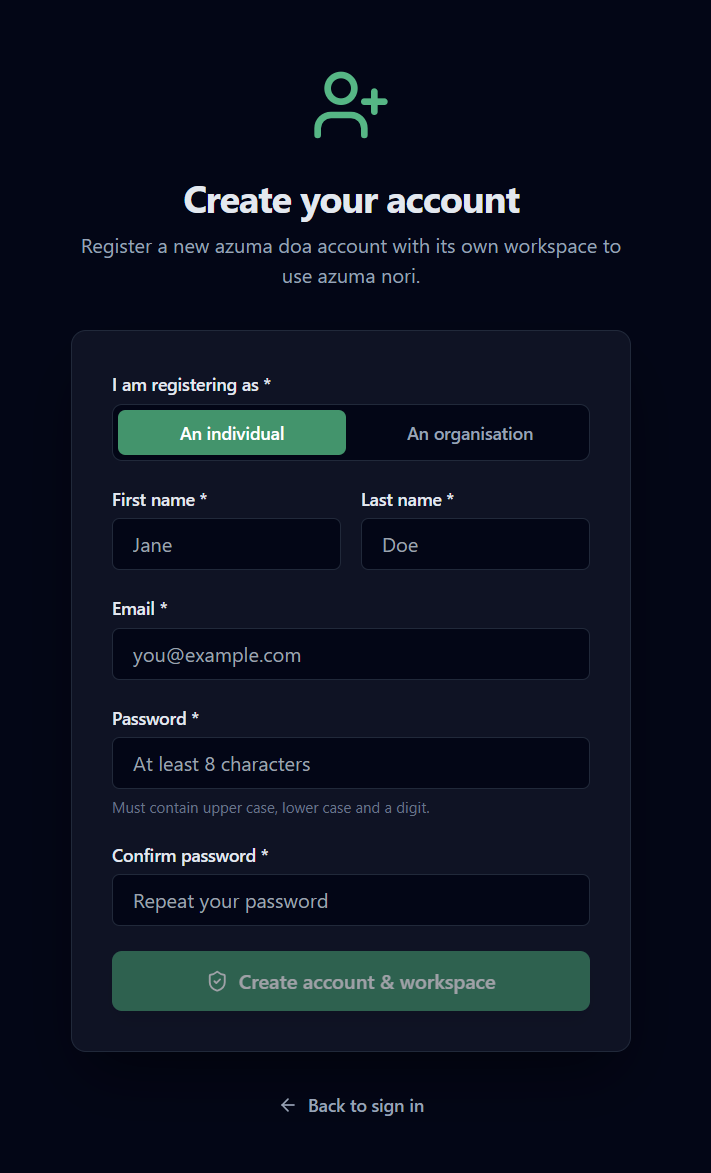
- Choose an account type:
- An individual — creates a personal workspace named after you.
- An organisation — creates a shared workspace. Enter an Organization name (this becomes your workspace name) and tick I'm allowed to act on behalf of the organisation.
- Enter your First name, Last name, and Email, then set a Password — at least 8 characters, including an upper-case letter, a lower-case letter, and a digit — and confirm it.
- Click Create account & workspace.
- Verify your email. nori sends a verification code to your address; enter it on the Check your email screen. Use Resend code if it doesn't arrive, or pick I'll verify later to complete it another time.
- On Account created, click Continue to sign in and log in with your new credentials (step 3 above).
Next, proceed to Choose a Plan.